Gallagher Command Centre
Integration Guide

This integration connects Sine with Gallagher Command Centre, allowing visitor and access data to sync between the two systems. It enables organizations to manage physical access control for visitors directly from their existing Gallagher security infrastructure. This guide is intended for system integrators and IT administrators responsible for configuring and maintaining the connection between Sine and Gallagher Command Centre.
Overview
Sine integrates with Gallagher Command Centre to automatically provision and revoke visitor access credentials, with destination mapping that controls access by floor or location. The integration supports Sine QR Code credentials, which can be printed on visitor badges or sent via SMS, and Physical Assets credentials, such as HID proximity cards, which are managed in Sine and assigned to visitors on check-in.
How It Works
Sine integrates with Gallagher Command Centre via API to provision and revoke access credentials in real time, allowing visitors to move through Gallagher-controlled doors using credentials issued directly from a Sine visit record.
QR Code
Visitors are issued a Sine QR Code credential that can be scanned at compatible Gallagher readers, allowing entry without a physical access card.
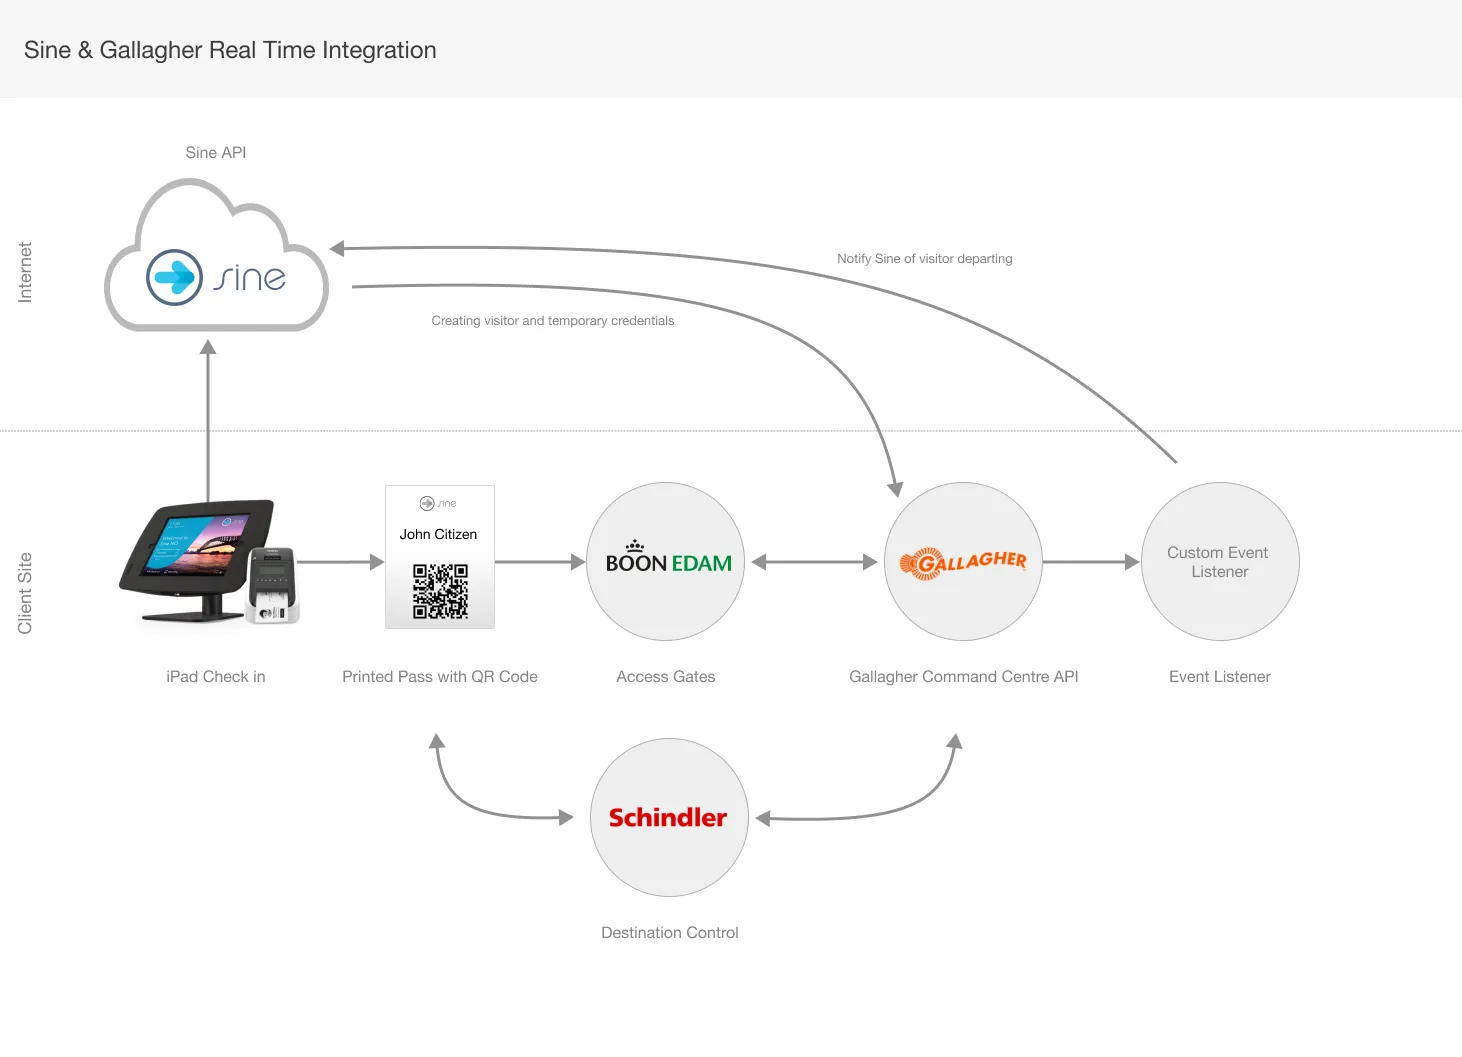
Check-in Flow:
The visitor initiates check-in through Sine using a kiosk, the mobile app, the web check-in flow, or a printed QR poster.
Sine provisions a unique QR code credential, scoped to the visitor's assigned access groups for the duration of their visit.
Once the visit is approved following security and compliance checks, Sine activates the QR code credential in Gallagher Command Centre.
Sine delivers the QR code to the visitor via SMS or displays it on their printed badge.
The visitor presents the QR code at a Gallagher reader with QR/barcode scanning support, and the door unlocks.
Check-out Flow:
The visitor checks out through the Sine app, at a kiosk, by notifying their host, or automatically on exiting the geofence area.
Sine revokes the QR code credential in Gallagher Command Centre, preventing any further use for entry.
Requirements
Sine Requirements
- Integration enablement: Ensure you have a Sine subscription that supports the Gallagher Command Centre integration and that the integration is enabled on your account. Additional fees may apply.
Gallagher Command Centre Requirements
- Command Centre: You need a Gallagher Command Centre system running version 8.30 or higher.
- Command Centre API Licensing: API access to Command Centre requires one of the following licensing approaches.
- Sine integration partner license: A single Sine partner license covers all required API access. This is the recommended approach for simplified onboarding.
- Gallagher individual API licenses: Purchase individual Gallagher licenses for each required capability.
- C12784 - Licence REST Cardholder API (required): This license is required for the visitor check-in flow. It allows Sine Core to create cardholder records in Command Centre.
- C12772 - Licence REST Alarms and Events API: This license is needed to detect when visitors leave your site by scanning their QR code at an exit gate.
- C12814 - Licence Schindler Call by Profile: This license is required for Schindler elevator control.
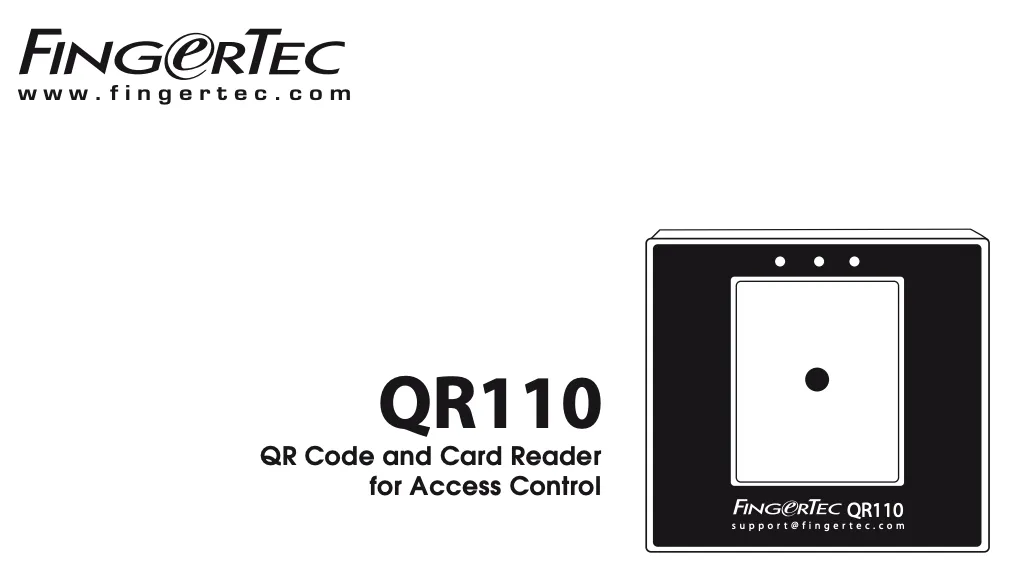
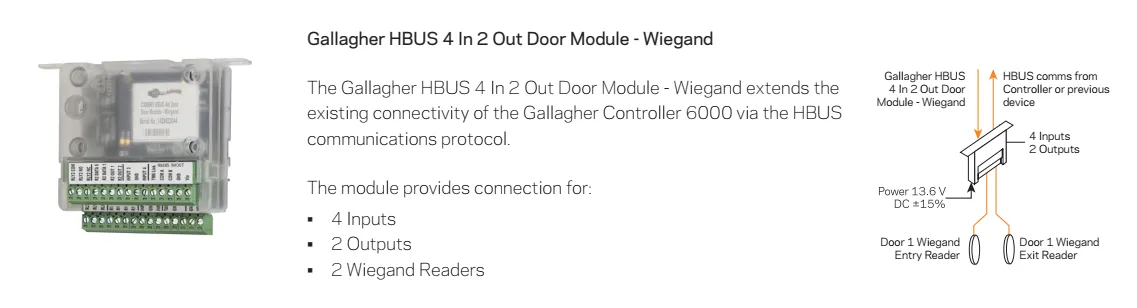
- QR Reader: If you plan to use QR codes for access, you need a compatible QR access reader. Confirm compatibility with Gallagher or your Access Control Integration Partner. A reader similar to this one is suggested.
- Credential pool: If you plan to issue physical access cards, ensure you have an available credential pool.
- Testing environment: Set up a sandbox environment or another safe testing space before configuring the integration in production.
- Cardholder templates: Configure the visitor cardholder division and templates in Command Centre before proceeding.
- Network connectivity: Determine how you will connect Sine to your on-premise Command Centre system.
- Direct API access: This method requires network firewall access to the Command Centre API from outside your network.
- Gallagher API Cloud Gateway: You can configure the Gallagher API Cloud Gateway on the Gallagher Command Centre system (available from v8.60 onwards).
Configuration
Gallagher Command Centre Configuration
Network Configuration
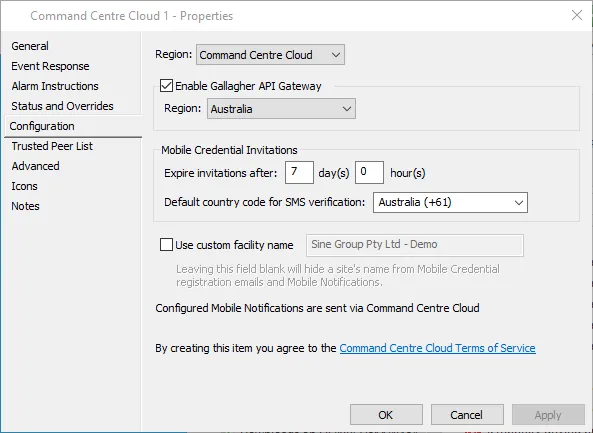
The integration supports both a local, isolated Gallagher Command Centre deployment and the Gallagher API Cloud Gateway. The requirements for each option differ slightly, so review the following networking configurations carefully:
To use the integration with your local network, configure your network to:
- Allow incoming access from the internet for our API servers by whitelisting our NAT IP addresses. Refer to this page for an up-to-date list of IP addresses.
- Allow outbound calls from the CallbackSignature software to our API servers. Depending on your firewall setup, this may require exposing all internet access.
REST API Configuration
Sine Core communicates with Gallagher Command Centre via a REST API client. In this section, you will complete the following:
Enable Web Services
Log on to Gallagher Command Centre and open the Configuration Client.
Click on the File > Server Properties menu option.
In the window that appears, click on Web Services in the sidebar.
Update the REST API section to match the following screenshot. 8904 is the default base port, but your network specialist may specify a different one for you to use.
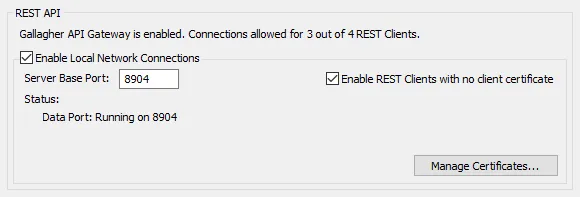
Click Manage Certificates and confirm that the Server Certificate is set to Default Internal Certificate.
Apply your changes and close the Server Properties window.
Create an Operator Group
Create an operator group specifically for the integration with Sine Core. This user should be created following the principle of least-privilege to help keep your access control system secure. For more information on Gallagher operator privileges, see their official documentation.
In the Configuration Client menu, click on Manage > Operator Privileges and leave the window open while you continue.
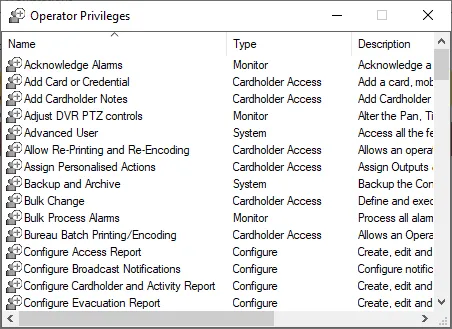
Navigate to the Manage > Operator Group menu.
Right click and select New > Operator Group.
Click the Operator Privileges item in the sidebar and configure the required privileges as shown in the following image. You can drag and drop privileges from the window you opened in step 1.
Do not use Advanced User for the REST Operator, as this grants an unnecessarily high access level to the Sine Core integration. Gallagher recommends that 'to protect Command Centre from accident and malice, you should strive to grant your REST clients the fewest and lowest-level privileges you can.'
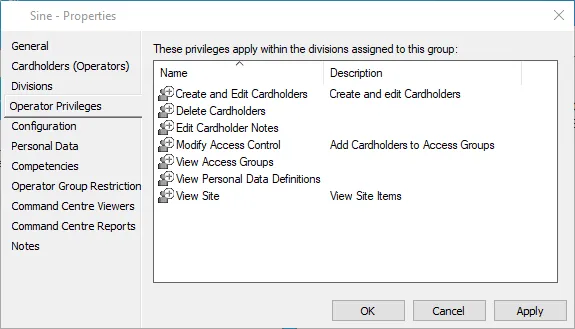
Click OK to save your changes and close the window.
In the Operator Groups window, right click on the operator you created and select Copy.
You can return to this window if you lose your clipboard content, but note that a REST Client without an Operator will not be able to save.
This copy action prepares the operator for assignment to the REST Client you will create in the next section.
Configure the REST Client
Navigate to Configure > Services and Workstations.
Right click and select New > REST Client.
Click General in the sidebar and name the REST Client so it's easy to recognise as being associated with Sine Core.
Click Event Response in the sidebar. You can generate actions for any event Group / type by selecting from the dropdowns at the bottom.
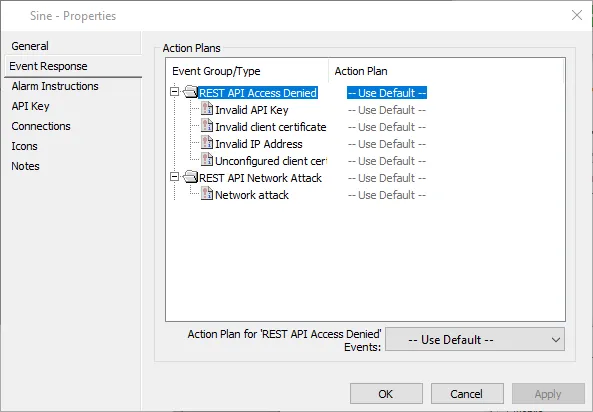
Navigate to the Alarm Instructions tab. You can assign instructions for any event Group / type by selecting from the dropdowns at the bottom.
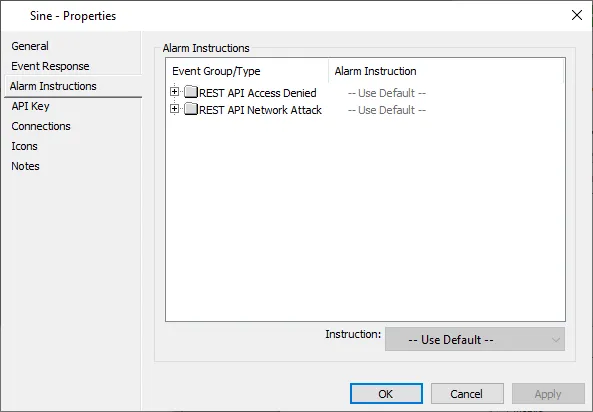
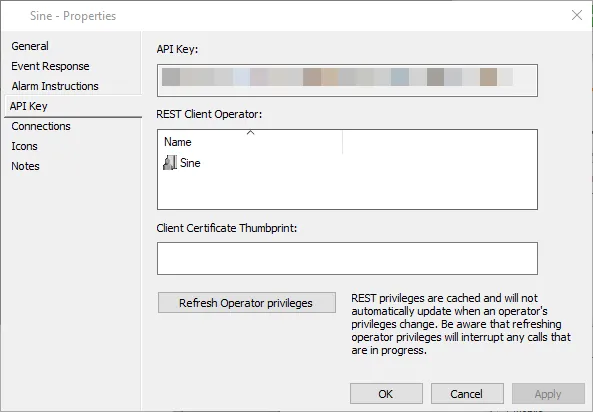
Navigate to the API Key tab:
- An API Key is generated for the current REST Client.
- To assign the REST Client Operator you copied earlier, right click in the blank area and select Paste.
- If any changes are made to the REST Client Operator, press the Refresh Operator Privileges button to update.
- Copy the API Key. You will need it to configure the Sine Core Gallagher Integration.
- The API Key must be kept secret.
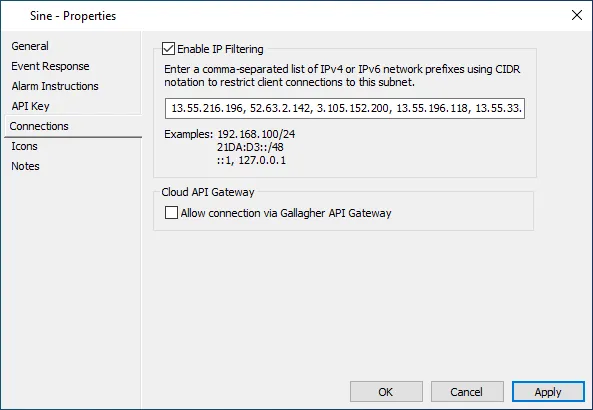
Navigate to the Connections tab:
- Select Enable IP Filtering. This allows a restricted list of IP addresses to connect to your Gallagher Command Centre server.
- If using the direct connection method, input the Sine Core IP addresses listed at https://sine.support/en/articles/2103291-firewall-rules-and-whitelisting.
- Refer to the Network requirements section for more information.
Once all required configuration has been completed, click OK to save your changes and close the window.
Other Requirements
Configure the following additional items in Gallagher Command Centre before setting up the integration in Sine Core:
Card Types
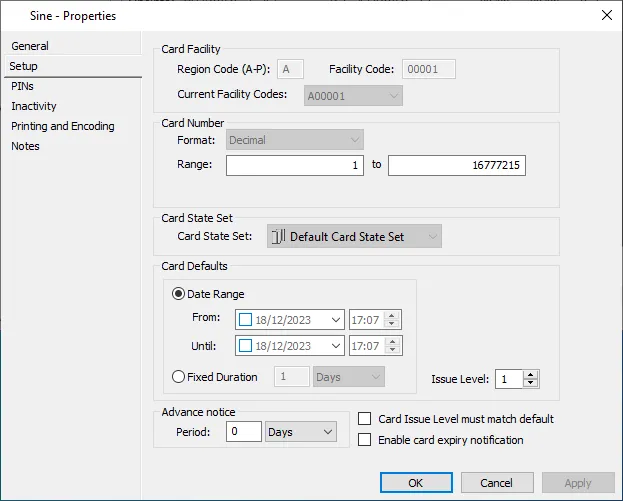
Create a new Card Type specifically for use with Sine Core.
Navigate to Configure > Card Types.
Right click and select New > Access Group.
Configure the Card Type as required.
Divisions
Visitors need to be saved to a Gallagher Division. The Gallagher REST Operator must have access to, and the ability to create, cardholders in that division.
Navigate to Configure > Divisions.
Right click and select New > Division.
Configure the Division as required.
Access Groups
Your Gallagher Command Centre should already contain one or more access groups for your building. Before you begin setting up the Gallagher integration in Sine Core, confirm that your access groups are sufficient for mapping to your Sine Core host groups.
Access Groups are used to provision access for Sine Core visitors after they check in at a kiosk or via the web client.
Navigate to Manage > Access Groups.
Right click and select New > Access Group.
Configure the Access Group as required.
Personal Data Fields
Sine Core requires that 2 Personal Data Fields (PDFs) be created in Gallagher and assigned to the Access Groups used for visitors.
Assign these PDFs to the Gallagher Access Groups configured in Sine Core for visitors.
It is important to configure the Personal Data Fields exactly as described in the steps below. If these PDFs are not named correctly or assigned to the Access Groups, the integration will fail to create cardholders upon completion of check-in.
Navigate to Configure > Personal Data Fields.
Right click and select New > Personal Data Field to create a PDF called Email and configure it as Email Type.
Select New > Personal Data Field again to create the second required field.
QR Reader Configuration
If you are using Sine QR Codes for access control, you must install and configure a compatible QR Reader in Gallagher Command Centre before the integration will function correctly.
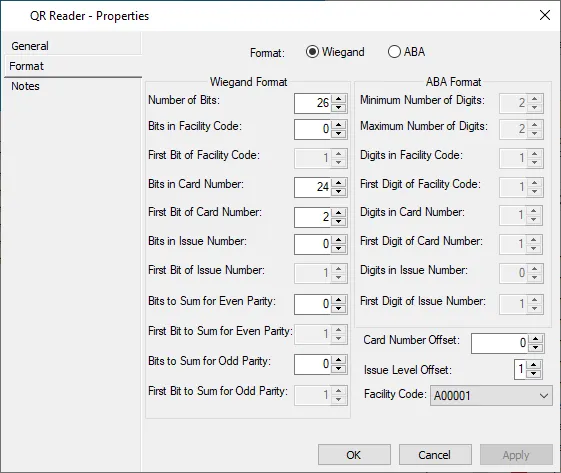
Install and configure a compatible QR Reader on the Gallagher Controller as a 3rd Party Reader. A Universal Card Format (UCF) must also be configured so that the Controller recognises the Wiegand format when a credential is read by the QR Reader.
Gallagher QR Reader Universal Card Format configuration — Create a new QR Reader UCF and assign it to every Controller that has QR Readers attached to it:
- Navigate to Configure > Universal Card Formats.
- Right click and select New > Universal Card Format.
- Navigate to the Format tab.
- Configure the format according to your QR reader requirements.
- Select OK to save your UCF configuration.
- Navigate to Configure > Hardware.
- Click the + button to the left of your Command Centre to expand it and locate your controller.
- Double click the controller name to configure it.
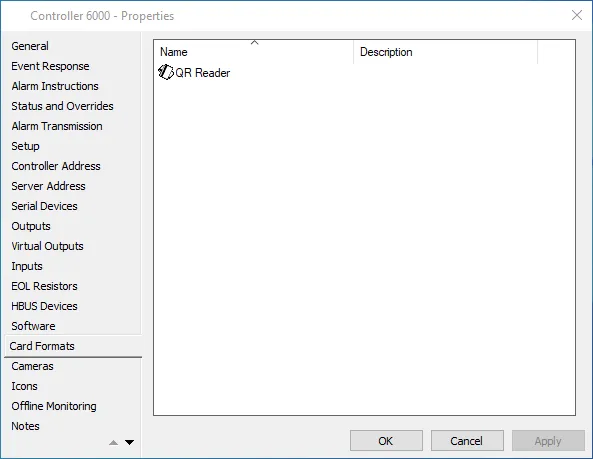
- Navigate to the Card Formats tab.
- Drag and drop the UCF you configured in the previous steps.
- Select OK to save. Remember to assign the UCF to every controller that has a QR Reader attached to it.
- The Fingertec QR reader is known to work with Gallagher Controllers and Sine Core QR Codes. These readers can be sourced from Fingertec Australia Resellers.
- Experience has shown that the input voltage may need to be regulated down to 9 volts DC.
- These readers are wired into a Gallagher HBUS 2 Door Module Wiegand Variant or a Gallagher 4R or 8R Module.
Check-out Callback Service
As part of the setup completed by your integration partner, the Gallagher Check-out Callback Service is installed on the Gallagher Command Centre server. This service notifies Sine Core when a check-out event occurs in Gallagher.
- This service is relevant for organisations that want to use an Access Gate QR Code scan to trigger a check-out in Sine Core.
- In conjunction with your Gallagher Visitor Group rules, activating this callback service gives you control over how and when visitors are checked out.
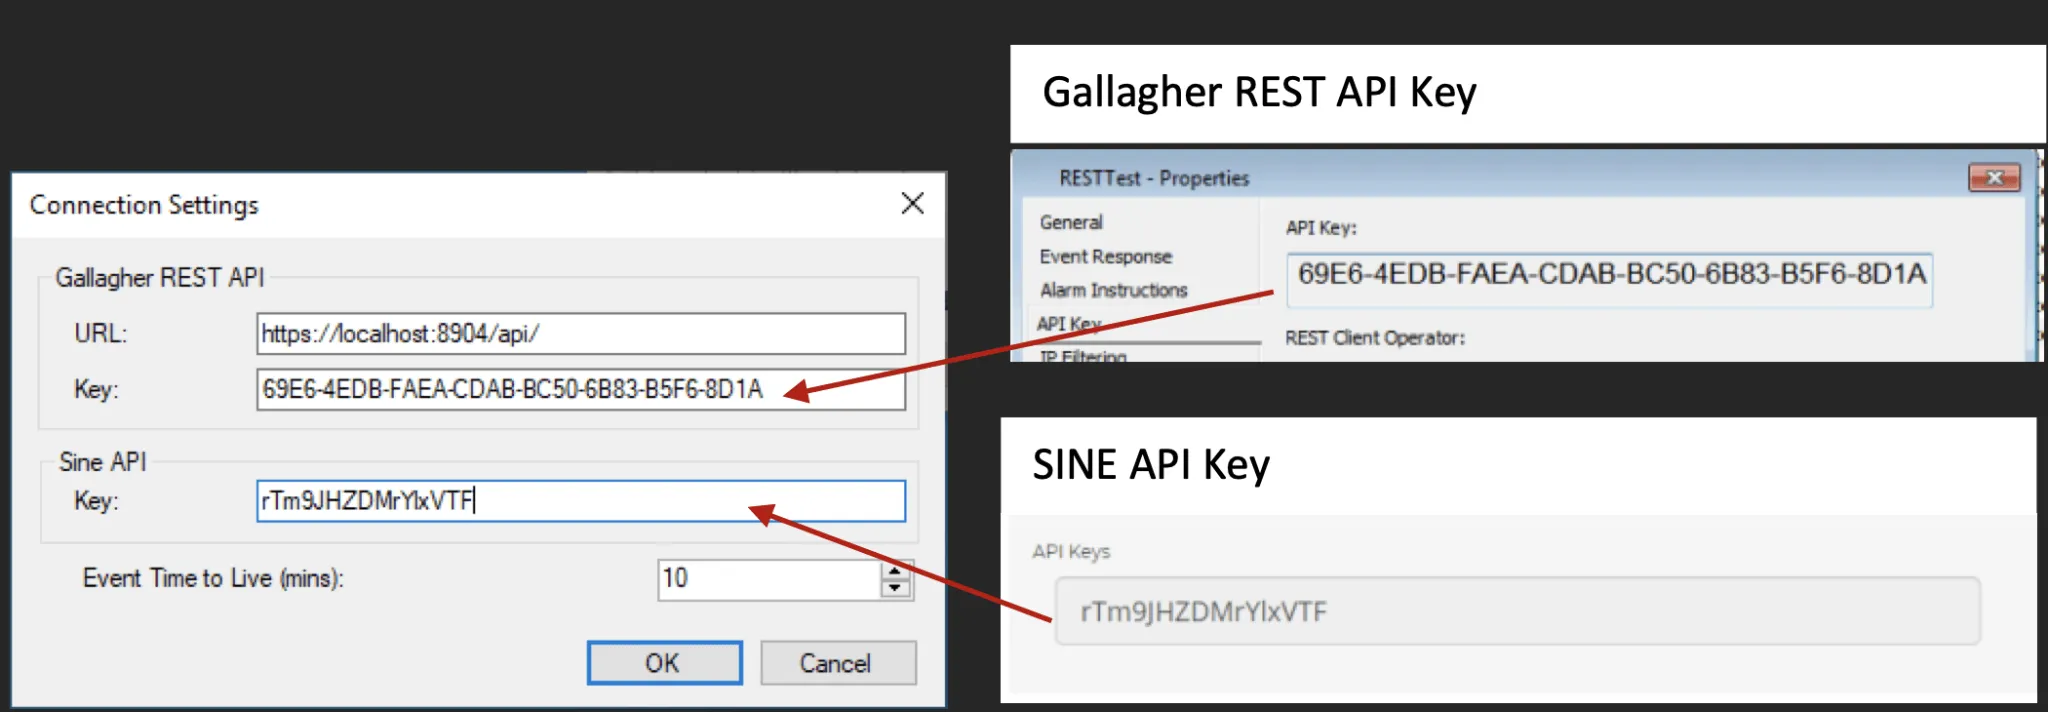
Generate Sine Core API Key — In the Sine Core Dashboard, navigate to Team and generate an API key. You must be a Team Admin for the site you are setting up to access this option.
Download and Install the Callback Service — Download the Callback Service installer and documentation, then follow the installation steps provided.
Update Gallagher Command Centre Connection Settings — For the callback functionality to work, update your Gallagher Command Centre configuration by updating the Connection Settings.
Sine Configuration
General Setup
Admin permissions — Ensure you have Team or Site Admin permissions. These permissions are required to configure integrations.
Log in — Log in to the Sine admin dashboard at https://dashboard.sine.co.
Select site — Navigate to the Locations tab and click on the site you want to configure the integration for.
Add integration — In the Site menu, click on the Integrations menu item. Click the Add integration button and select Command Centre from the list of available integrations. If the integration does not appear in the list, contact support.
Name integration — Enter a name for the integration. You can use any name, but choose something that helps you identify the purpose of the integration.
Connect to Gallagher Command Centre
Choose the appropriate connection method and licensing option.
- Sine Licensing — Toggle on the Sine Licensing setting to use the Sine integration partner license for simplified onboarding with Gallagher Command Centre.

You can connect to Command Centre using one of two methods. The preferred method is via the Gallagher Cloud API Gateway. For more information on the Cloud API Gateway, see the Gallagher website.
For Base URL, enter the official Gallagher Cloud API Gateway: https://commandcentre-api-au.security.gallagher.cloud.
Enter your API Key. This value is sourced from the Gallagher REST Client within the Command Centre Configuration Client. Copy the API key from the Configuration Client and paste it into this field. We recommend leaving Ignore SSL Certificate Check disabled when connecting via the Cloud API Gateway.
Click the Test Connection button to verify that the connection to your Gallagher Command Centre is working. Once the test completes, you'll see a list of results confirming whether the connection was successful or helping you diagnose any problems.
Once you have verified that the configuration is correct, click the Create button.

Integration Settings
Credential Configuration
Controls the type of access control credential that will be generated when the integration runs.
Select your preferred credential type below.
Generates and attaches a QR code to a visitor's pass. The integration runs when a pass is created, when a pass expires, or when the visitor checks out.
Badge Style — Select the style of printed badge to use when this integration runs. Some access control readers require a specially formatted access badge style rather than the default name badge style.
Send QR Code by SMS — If the visitor's mobile number is available, send them a QR code credential via SMS. This can serve as a useful backup to a badge printer.
Provision credential on check-in — Select one or more visitor types for which the integration should provision credentials in your access control system upon check-in via Sine. Ensure the Host Selection Required checkbox is enabled for any visitor types used in access control integrations. Without this setting, visitors would receive access credentials without host approval. You can review which visitor types have Host Approval Required enabled in the General tab of your site settings.
Grace Period — Configure a grace period to ensure a visitor's access control credentials are not deprovisioned immediately after they check out in Sine. This accounts for situations where a visitor checks out before physically leaving the location and still needs their credentials to exit.

Basic Configuration
Card Type — Select a Card Type from your Gallagher system to use when creating visitor credentials.
Division — Select the Division that the card will be assigned to.
Personal Data Fields
Check-in photo — Map the PDF from your Gallagher system that will contain the visitor photo.
Company name — Map the PDF from your Gallagher system that will contain the company name.
Access Group Mapping
You must map at least one host group or zone to a Gallagher access group for the integration to work.
- Access type — Select how you want to map visitor credentials to your Gallagher access groups:
- Map the Sine Core host group to a Gallagher access group.
- Map the Sine Zone to a Gallagher access group (available only if the Zones feature is enabled for your account). For each type (host group or zone) you want to map, click the Create Mapping button. You will be prompted to select:
- You will also be prompted to enter any optional PDF values to add to the visitor's details in your Gallagher system. These are intended for the Schindler Elevator Integration.
Messages
- Visitor failure message — Configure the message displayed to the visitor if the access control integration fails for any reason.
Notifications
- Send integration failure notifications — Enter one or more email addresses to be notified, along with the corresponding failure details, if the integration fails.
Testing
Create a test check-in — Create a test visitor check-in using a visitor type configured for the integration.
Verify credential provisioning — Verify that the visitor profile is created in the vendor system and that credentials are provisioned correctly.
Test credential access — Test the credential at a compatible reader to confirm that access is granted.
Verify credential revocation — Check out the test visitor and verify that access credentials are revoked after the configured grace period.
Check failure notifications — Monitor the integration failure notifications to ensure they are working correctly.
Need help? Contact Sine Support at [email protected]