LenelS2 OnGuard
Integration Guide
This integration connects Sine with LenelS2 OnGuard, enabling visitor and access data to flow between the two systems so that credentials and access permissions stay synchronized. It allows organizations to manage visitor access directly through their existing OnGuard access control infrastructure, reducing manual credential administration. This guide is intended for system integrators and IT administrators responsible for configuring and maintaining the connection between Sine and OnGuard.
Overview
Sine integrates with LenelS2 OnGuard to automatically provision and revoke visitor access credentials, with simplified connectivity for on-premise deployments through Sine Secure Bridge. The integration supports Sine QR Code credentials, which visitors can use via QR codes printed on badges or sent via SMS, and Physical Assets credentials, which let you manage physical cards such as HID proximity cards in Sine and assign them to visitors on check-in.
How It Works
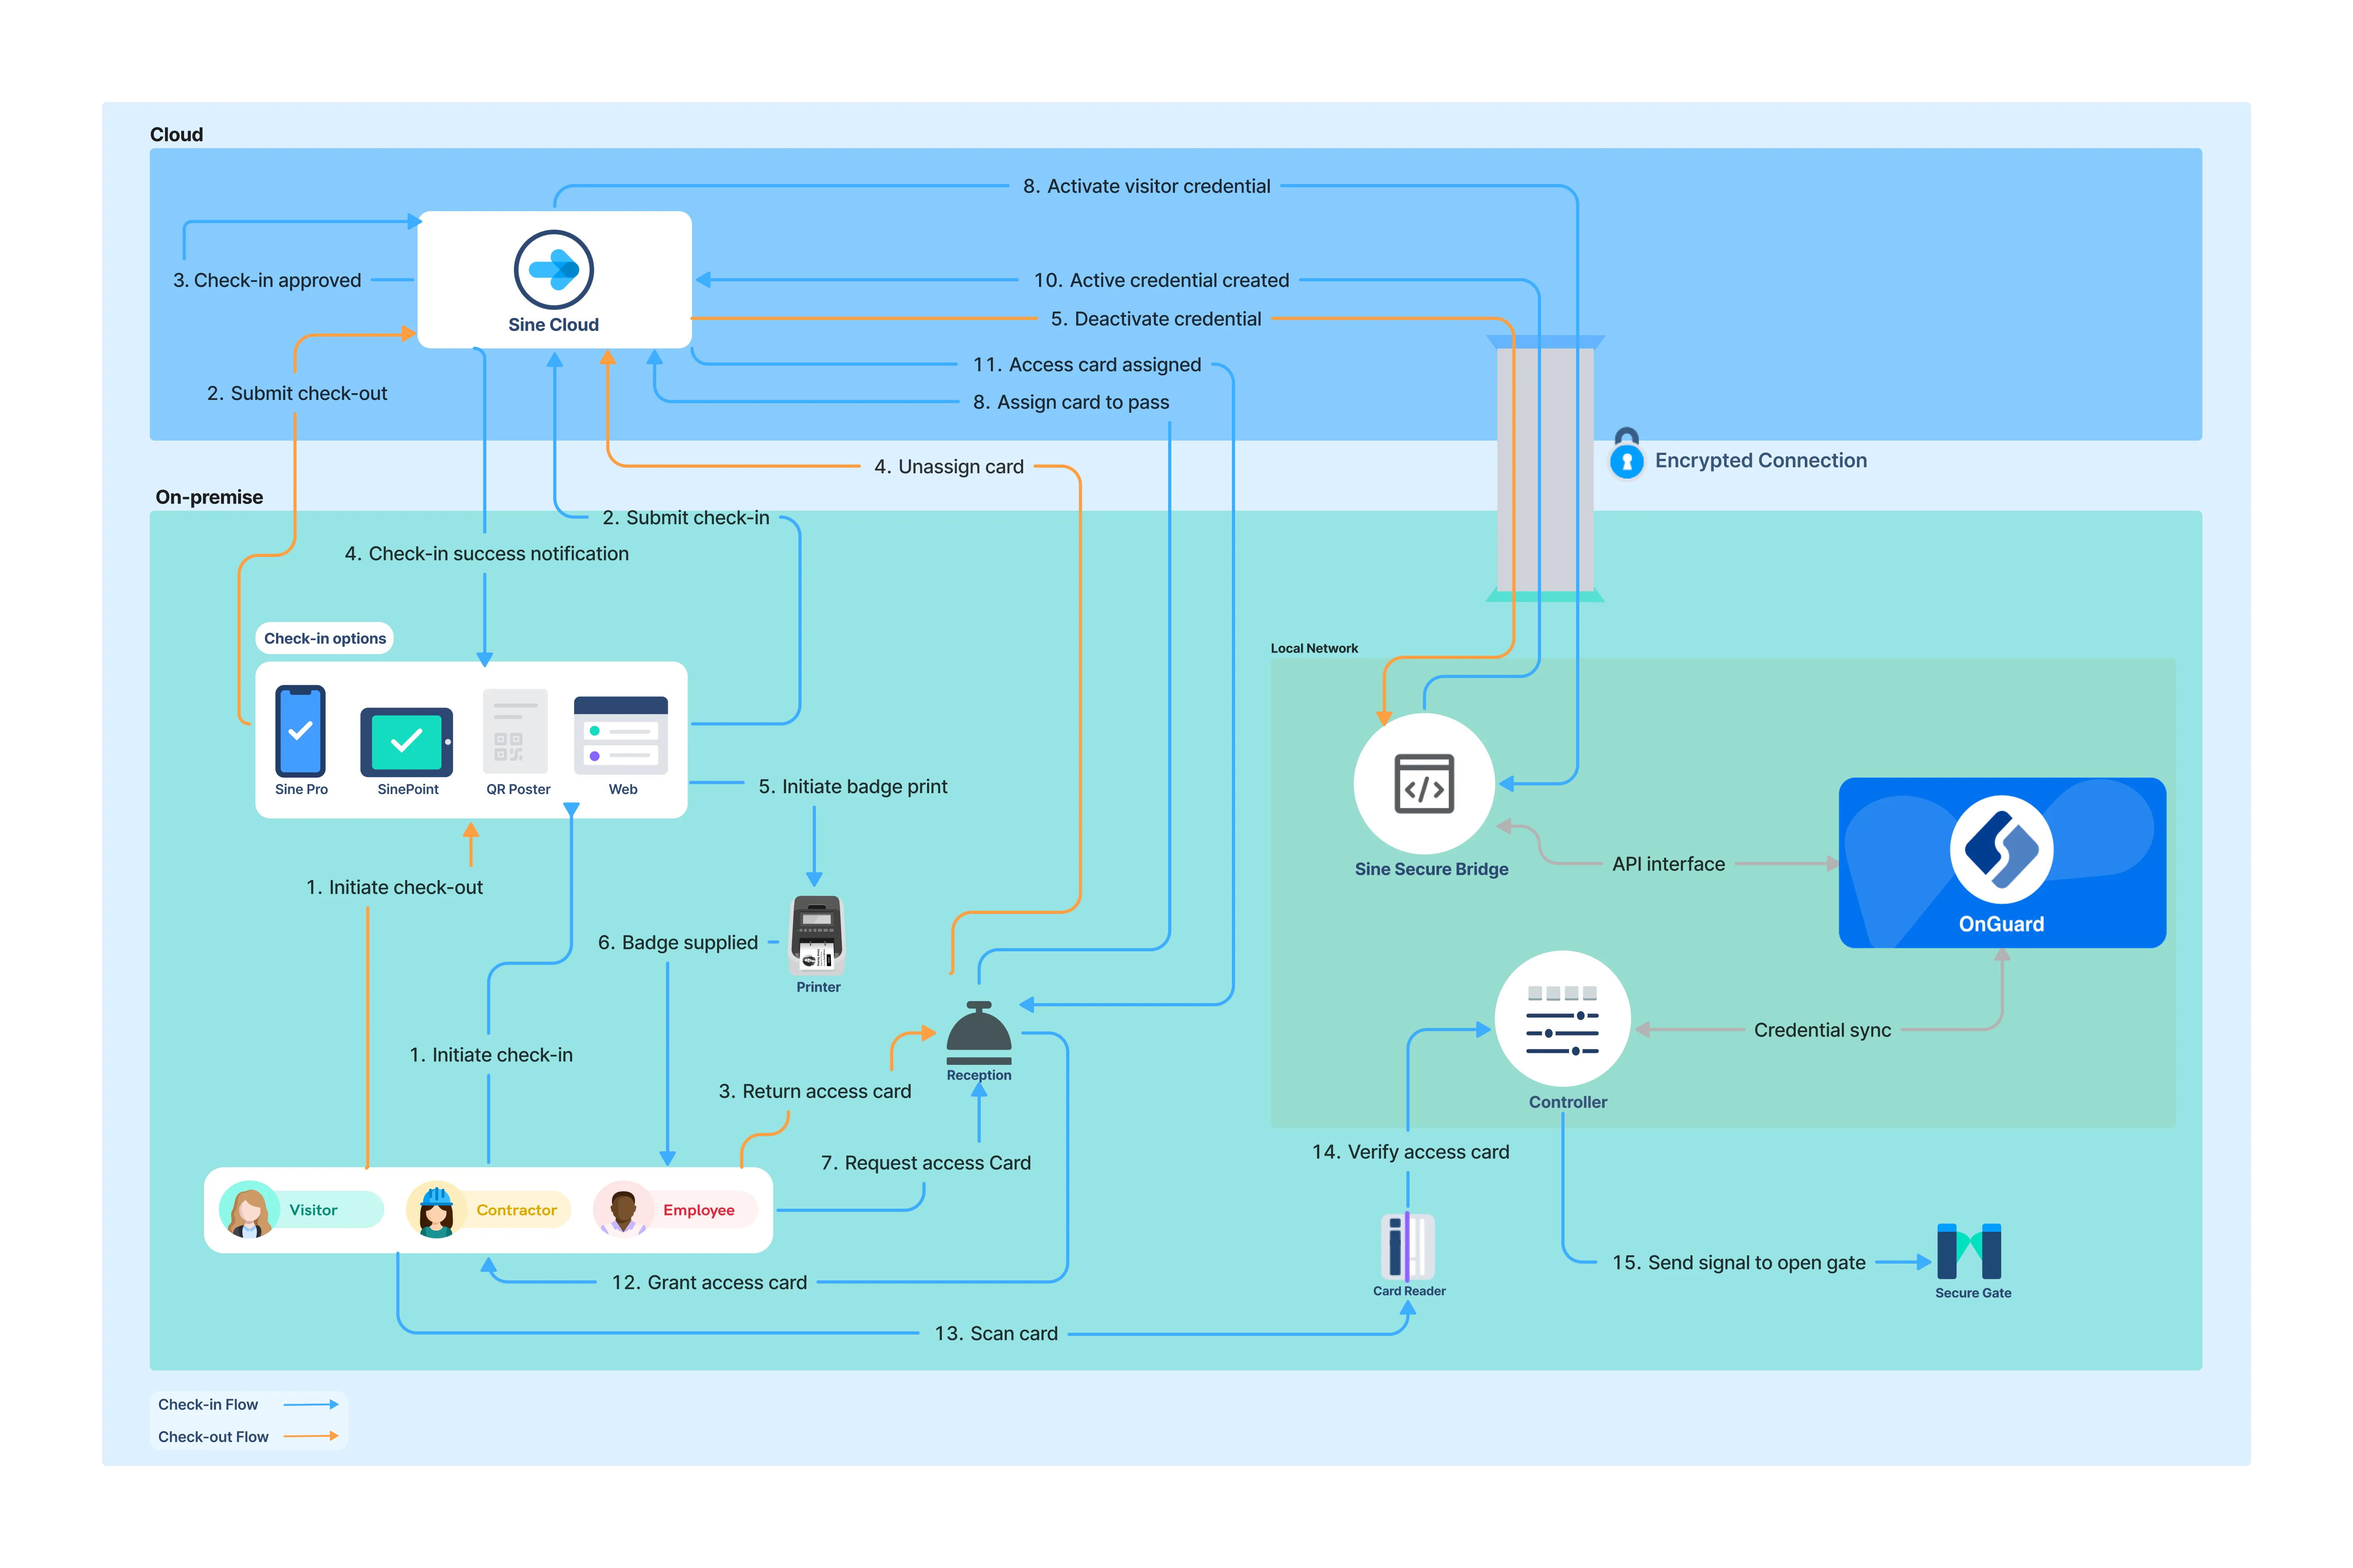
Sine integrates with LenelS2 OnGuard to synchronize visitor credentials with your access control infrastructure in real time. When a visit is approved in Sine, the corresponding credential is provisioned or activated in LenelS2 OnGuard, and access is automatically revoked in OnGuard when the visitor checks out.
Select your preferred check-in method below.
Visitors are issued a Sine QR Code credential that can be scanned at compatible readers to request entry through LenelS2 OnGuard-controlled doors.

Check-in Flow:
The visitor initiates check-in through Sine via kiosk, mobile app, web, or a printed QR poster.
Sine provisions a unique QR code credential, scoped to the visitor's assigned access groups for the duration of their visit.
Once the visit is approved following security and compliance checks, Sine activates the QR code credential in LenelS2 OnGuard.
The QR code is delivered to the visitor via SMS or displayed on their printed badge.
The visitor presents the QR code at a reader with QR/barcode scanning support, and the door unlocks.
Check-out Flow:
The visitor checks out via the Sine app, kiosk, by notifying a host, or by exiting the geofence area.
Sine revokes the QR code credential in LenelS2 OnGuard, preventing any further entry attempts with that code.
Requirements
Sine Requirements
- Integration enablement: You need a Sine subscription with the LenelS2 OnGuard integration enabled. Additional fees may apply.
LenelS2 OnGuard Requirements
- OnGuard server: You need an OnGuard server with the LS OpenAccess service installed and licensed. The server must be reachable via the OpenAccess REST API, either through external network access or through the Sine Secure Bridge.
- API credentials: You need an OnGuard system user, or a directory user (LDAP/Active Directory), with sufficient permissions to create and manage visitors, badges, and access level assignments.
- QR Reader: If you plan to use QR codes for access, you need compatible QR access readers. Confirm compatible reader models with LenelS2 or your Access Control Integration Partner. A reader similar to this one is suggested.
- Credential pool: If you plan to use physical access cards, you need an available credential pool.
- Testing environment: You need a sandbox environment or a safe testing space to validate the integration before deploying it to production.
- Network connectivity: Determine how you will connect Sine to your on-premise OnGuard system.
- Direct API access: This method requires network firewall access to the OnGuard API from outside your network.
- Sine Secure Bridge: This method requires installation of the Sine Secure Bridge agent to establish a secure, managed tunnel between your on-premise OnGuard system and Sine.
Configuration
LenelS2 OnGuard Configuration
Badge and Access Level Setup
Badge type — Ensure the badge type used for visitors has its Badge ID Allocation Type set to Manual Entry. If it is set to Automatic, OnGuard rejects any badge creation request that includes a Sine-generated badge number.
Access levels — Create the access levels in OnGuard that should be available for assignment to visitor badges.
Badge statuses — Confirm the badge statuses to use for pending and lost badges. Active is a fixed system status, while other statuses such as Lost and Returned are user-defined and can be reviewed in OnGuard under Administration.
Visitor UDF fields (optional)
- Visit ID: Sine's unique identifier for the visit.
- Company: The visitor's company name, if provided at check-in.
Sine Configuration
General Setup
Admin permissions — Ensure you have Team or Site Admin permissions. These permissions are required to configure integrations.
Log in — Log in to the Sine admin dashboard at https://dashboard.sine.co.
Select site — Navigate to the Locations tab and click on the site you want to configure the integration for.
Add integration — In the Site menu, click on the Integrations menu item. Click the Add integration button and select LenelS2 OnGuard from the list of available integrations. If the integration does not appear in the list, contact support.
Name integration — Enter a name for the integration. You can use any name, but choose something that helps you identify its purpose.
Connect to LenelS2 OnGuard
Connection Method
There are two ways to establish network connectivity to your on-premise LenelS2 OnGuard instance.
Select your preferred method below.
Sine Secure Bridge enables a secure, managed tunnel between Sine Cloud and your on-premise system's API.
Enable Secure Bridge — Switch Use Sine Secure Bridge on to display a dropdown list of your Secure Bridge tunnels. If the Sine Secure Bridge toggle is not visible, contact your Sine representative.
Documentation — For more information on installing and configuring a Sine Secure Bridge tunnel, visit the Secure Bridge Documentation.
Authentication
Credentials — Enter your LenelS2 OnGuard API User's username and password.
Test Connection — Click the Test connection button to confirm that your configuration is correct. Once Sine successfully connects to your LenelS2 OnGuard account, the Integration Settings section becomes available.
Integration Settings
Credential Configuration
Controls the type of access control credential that is generated when the integration runs.
Select your preferred credential type below.
Generates and attaches a QR code to a visitor's pass. The integration runs when a pass is created or expired, or when the visitor checks out.
Provision credentials on invitation — By default, visitor credentials are provisioned on check-in. If you enable this toggle, the QR code provided to the visitor in their invitation email is provisioned in LenelS2 OnGuard and activated closer to the start time of the visitor's invitation. Use this option to provide a more seamless experience, such as provisioning car parking access or access to secure areas prior to the visitor's arrival. Note: if you enable this toggle and also want to provision credentials on check-in, create a separate integration.
Badge number range — Specify the badge number range to use with QR code credentials. Sine randomly generates a new card number for visitors on check-in from within the range you provide. The range must be supported by your access control card formats.
Badge Style — Select the style of printed badge to use when this integration runs. Some access control readers require a specially formatted Access badge style rather than the default name badge style.
Send QR Code by SMS — If the visitor's mobile number is available, send them a QR code credential to their phone. This can serve as a useful backup to a badge printer.
Provision credential on check-in — Select one or more visitor types for which the integration should provision credentials in your access control system when they check in using Sine. Ensure the Host Selection Required checkbox is ticked for visitor types used in access control integrations. Without this setting, visitors receive access credentials without requiring approval from a host. You can review which of your visitor types have Host Approval Required enabled in the General tab of your site settings.
Grace Period — A visitor may use Sine to check out before leaving the location, but may still need to use their credentials to exit. Set a grace period to ensure their access control credentials are not deprovisioned immediately after they are checked out in Sine.

Basic Configuration
Directory — Select the directory to authenticate against. This dropdown is populated automatically from your OnGuard system and defaults to the built-in internal directory. Choose your LDAP or Active Directory directory if one is configured.
Badge type — Select the visitor badge type to assign to visitors. The selected badge type must use the Manual Entry badge ID allocation type so that Sine-generated badge numbers are accepted.
Access levels — Select one or more OnGuard access levels to assign to visitor badges.
Pending badge status — Select the badge status Sine assigns while a badge is pending. The badge remains in this status, and inactive, until the visitor's pass is approved or their invitation validity period begins.
Field Mapping
Visit ID field — Optionally select an OnGuard visitor field (UDF) to store the Sine visit ID on the visitor record.
Company field — Optionally select an OnGuard visitor field (UDF) to store the visitor's company name on the visitor record.
Messages
- Visitor failure message — Enter the message to display to the visitor if the access control integration fails for any reason.
Notifications
- Send integration failure notifications — If the integration fails, you can enter one or more email addresses to be notified of the failures and their corresponding details.
Testing
Create a test check-in — Create a test visitor check-in using a visitor type configured for the integration.
Verify credential provisioning — Verify that the visitor profile is created in the vendor system and that credentials are provisioned correctly.
Test credential access — Test the credential at a compatible reader to ensure access is granted.
Verify credential revocation — Check out the test visitor and verify that access credentials are revoked after the configured grace period.
Check failure notifications — Monitor the integration failure notifications to ensure they are working correctly.
Need help? Contact Sine Support at [email protected]