Siemens Sipass
Integration Guide
This integration connects Sine with Siemens Sipass, allowing visitor and access data to be shared between the two systems for streamlined access control management. It enables sites using Sipass to align visitor management workflows with existing physical security infrastructure. This guide is intended for system integrators and IT administrators responsible for configuring and maintaining the connection between Sine and Sipass.
Overview
Sine connects with Siemens SiPass to automatically provision and revoke visitor access credentials as visitors check in and out. This integration supports Sine QR Code credentials, which are assigned via QR codes printed on visitor badges or sent via SMS, and Physical Assets credentials, which let you manage physical cards, such as HID proximity cards, as assets in Sine and assign them to visitors on check-in.
How It Works
Sine integrates with Siemens Sipass via an on-premise adaptor, synchronizing visitor credential data between the cloud-based Sine platform and the Sipass access control system to automate credential provisioning and revocation.
QR Code
Visitors are issued a Sine QR Code credential that can be scanned at compatible readers connected to Siemens Sipass.
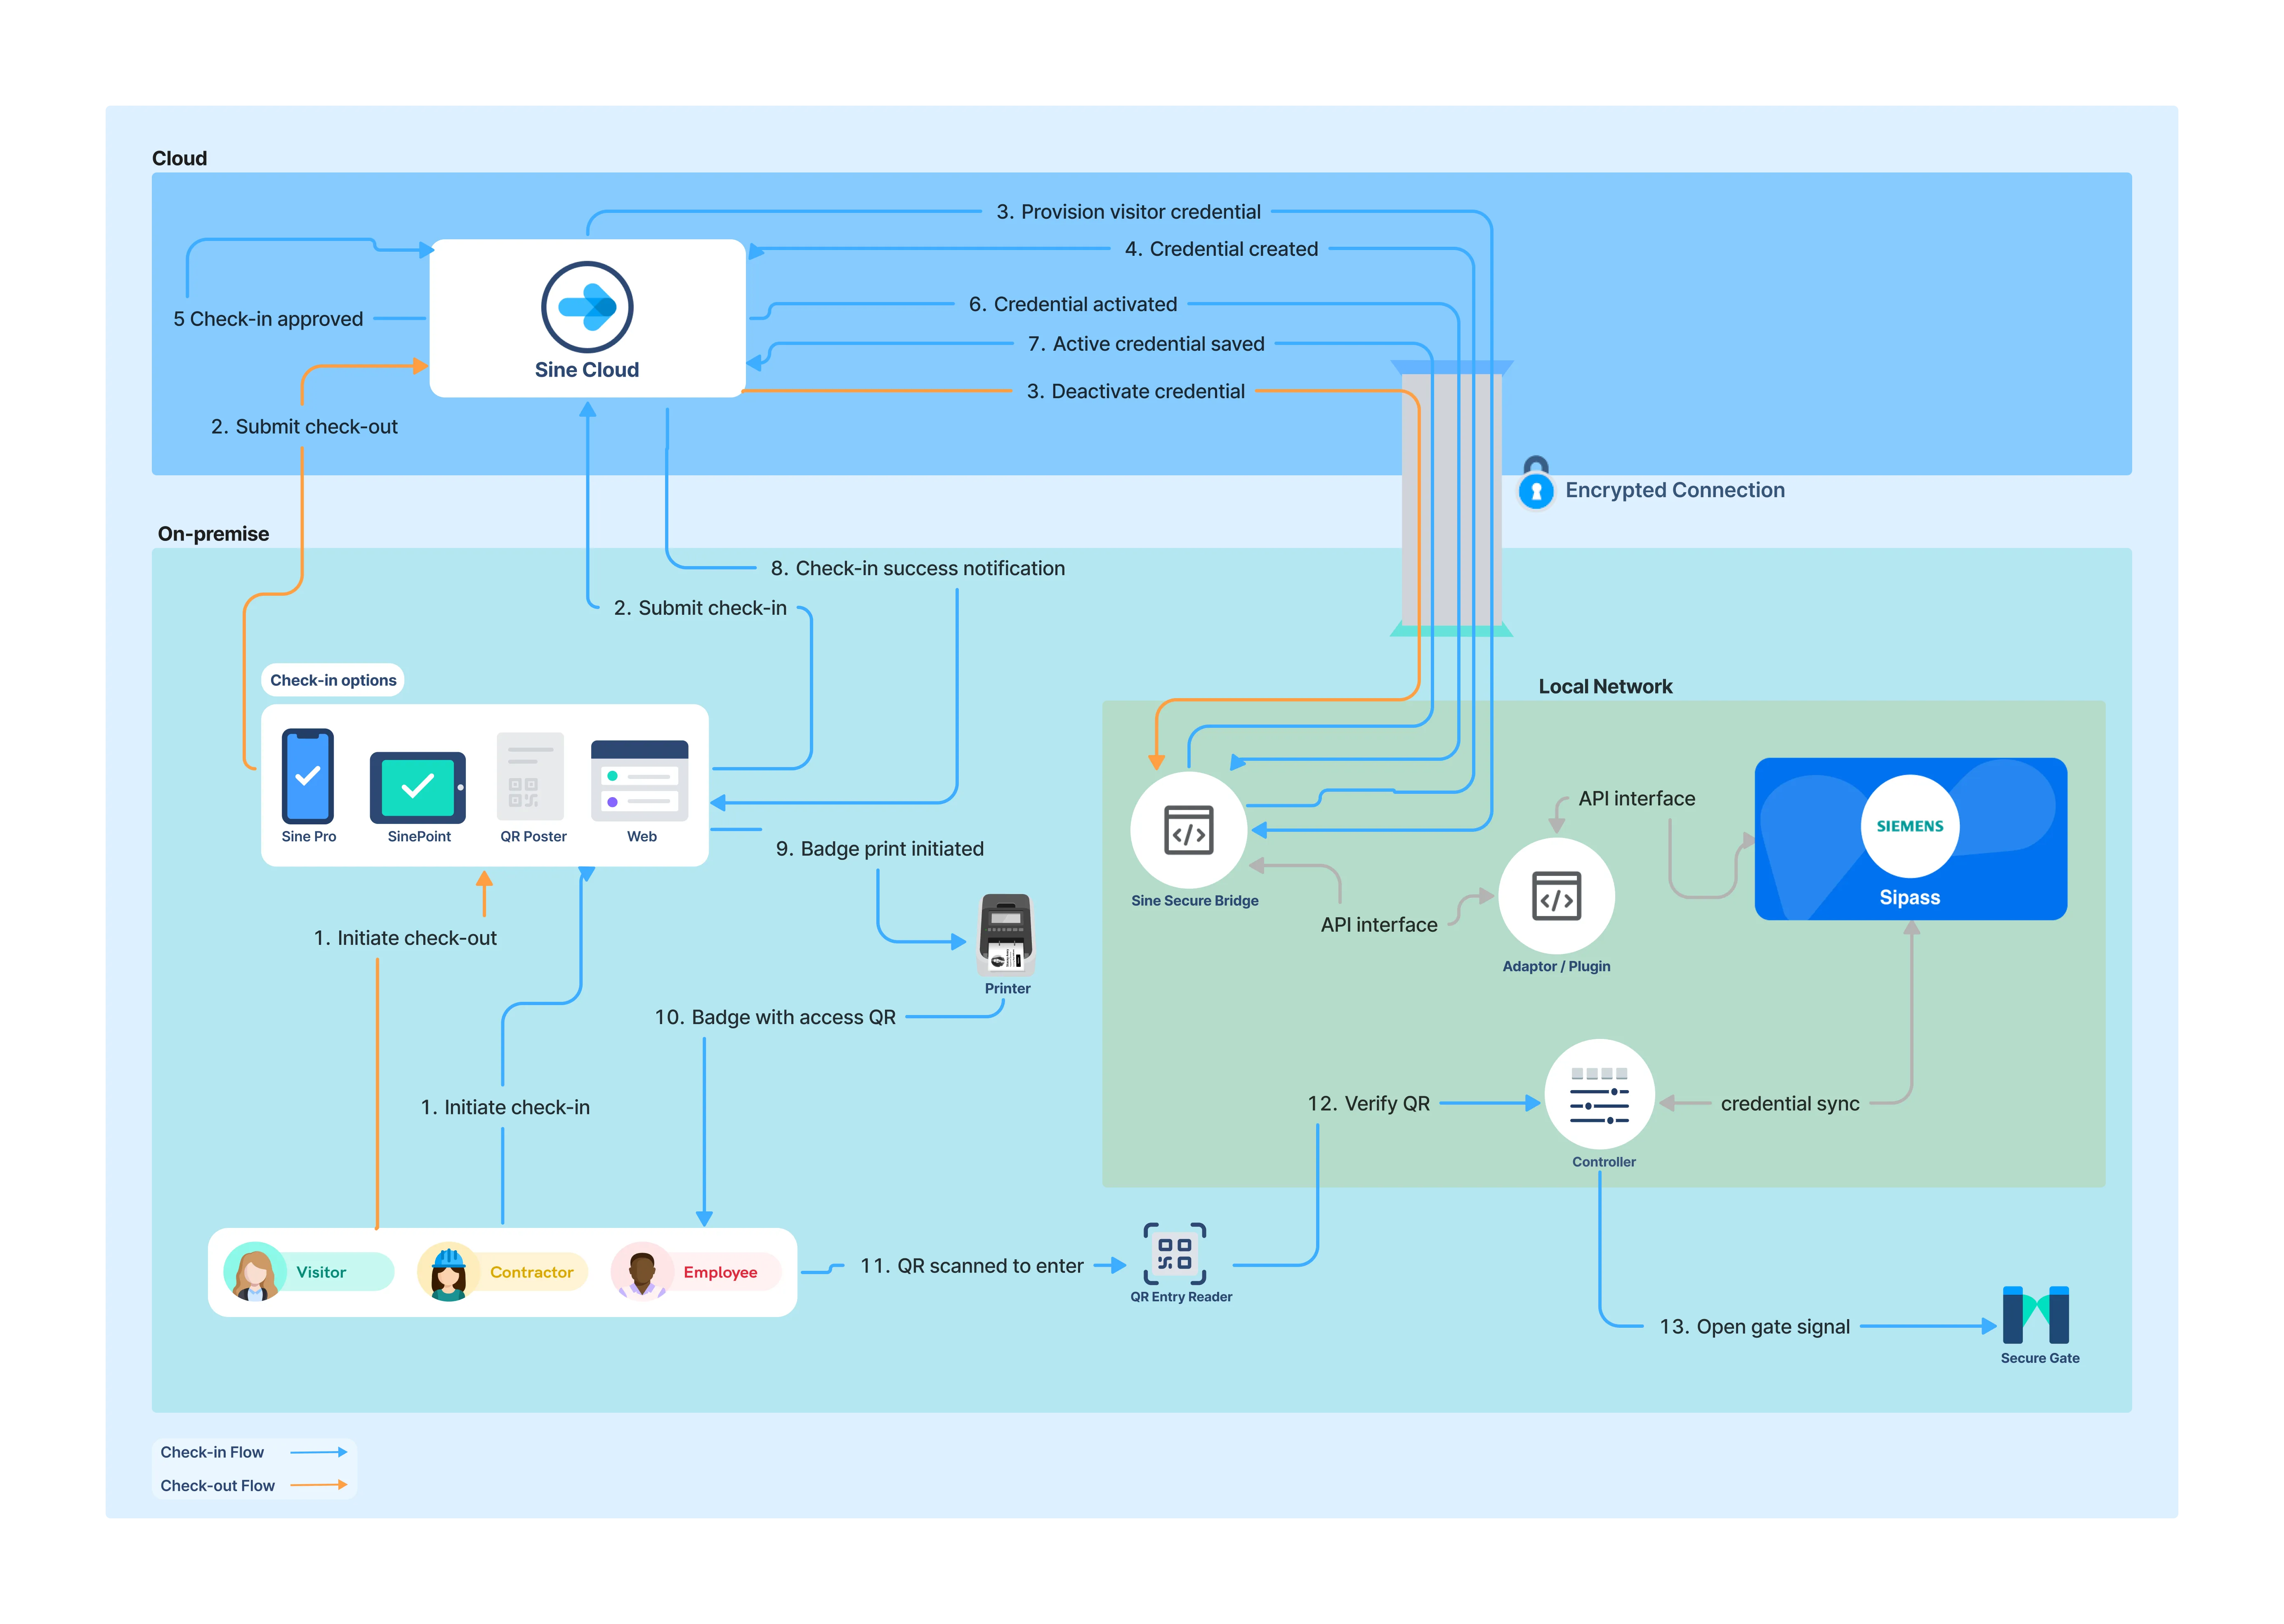
Check-in Flow:
The visitor initiates check-in through Sine, using a kiosk, the mobile app, a web form, or a printed QR poster.
Sine provisions a unique QR code credential, scoped to the visitor's assigned access groups for the duration of their visit.
Once the visit is approved following security and compliance checks, Sine activates the QR code credential in Siemens Sipass.
Sine delivers the QR code to the visitor via SMS or displays it on their printed badge.
The visitor presents the QR code at a reader with QR/barcode scanning support, and Siemens Sipass unlocks the door.
Check-out Flow:
The visitor checks out via the Sine app, at a kiosk, by notifying their host, or automatically on exiting the geofence area.
Sine revokes the QR code credential in Siemens Sipass, preventing any further entry attempts using that credential.
Requirements
Sine Requirements
- Integration enablement: Suitable Sine subscription with the Sipass integration enabled (additional fees may apply)
Siemens Sipass Requirements
- API License: API license for remote credential provisioning
- Data adaptor: Installation of the Sine data adaptor within Sipass. This is a middleware developed by Siemens that translates Sine's credential payloads into a compatible data format.
- QR Reader: Compatible QR access readers (if using QR codes for access). This should be confirmed with Siemens or your Access Control Integration Partner, however something similar to this is suggested.
- Credential pool: Available credential pool if using physical access cards
- Testing environment: A sandbox environment or safe testing space
- Network connectivity: Determine your method to connect Sine with your on-premise Sipass system.
- Direct API access: Requires network firewall access to the Sipass API from outside your network
Configuration
Siemens Sipass Configuration
Sipass Configuration
Enable API access — Enable API access or open protocol support (REST API) in Sipass.
API credentials — Create API credentials or configure system access permissions for credential provisioning.
Access zones — Configure access zones and permission groups to control visitor access.
Credential pool — Verify that a credential pool or credential issuing capability is available.
API documentation — Prepare the API or protocol documentation required for the Sine integration setup.
Sine Configuration
General Setup
Admin permissions — Ensure you have Team or Site Admin permissions. These are required to configure integrations.
Log in — Log on to the Sine admin dashboard at https://dashboard.sine.co.
Select site — Navigate to the Locations tab and click on the site you want to configure the integration for.
Add integration — In the Site menu, click on the Integrations menu item. Click the Add integration button and select Siemens Sipass from the list of available integrations. If the integration does not appear in the list, contact support.
Name integration — Enter a name for the integration. This can be anything, but choose a name that helps you identify what the integration is for.
Connect to Siemens Sipass
Connection Method
- Cloud to on-premise: This integration establishes a direct connection from the Sine cloud to your on-premise system's API.
Base URL — Enter the URL and port for your Siemens Sipass server. For example, https://your-siemens-sipass-server.com/api:1234.
Ignore SSL Certificate Check — Turn this setting ON if you are using a self-signed certificate, as the Siemens Sipass integration will not be able to validate the certificate.
Authentication
API Key — Enter your Siemens Sipass API Key and your External ID. The External ID can be any value.
Test Connection — Click the Test connection button to confirm that your configuration is correct. Once you have successfully verified that Sine can connect to your Siemens Sipass account, the Integration Settings section will become available.
Integration Settings
Credential Configuration
This setting controls the type of access control credential generated when the integration runs.
Select your preferred credential type below.
Generates and attaches a QR code to a visitor's pass. The integration runs when a pass is created or expires, or when the visitor checks out.
Send QR Code by SMS — If the visitor's mobile number is available, send them a QR code credential to their phone. This can serve as a useful backup to a badge printer.
Provision credential on check-in — Select one or more visitor types for which you want the integration to provision credentials in your access control system when visitors check in using Sine. Ensure that the Host Selection Required checkbox is ticked for any visitor types used in access control integrations. Without this setting, visitors would receive access credentials without requiring host approval. You can review which of your visitor types have Host Approval Required enabled in the General tab of your site settings.
Grace Period — A visitor may check out using Sine before leaving the location but may still need their credentials to exit. You can set a grace period to ensure that access control credentials are not deprovisioned immediately after the visitor is checked out in Sine.

Basic Configuration
Connection details — Enter the connection details specific to your access control system (API endpoint, credentials, IP address, or COM port).
Field mapping — Map Sine visitor fields to your access control system's cardholder schema.
Test connection — Test the connection and enable auto-provisioning for visitor check-in.
Messages
- Visitor failure message — Configure the message displayed to the visitor if the access control integration fails for any reason.
Notifications
- Send integration failure notifications — If the integration fails, you can enter one or more email addresses to be notified of the failure and its corresponding details.
Testing
Create a test check-in — Create a test visitor check-in using a visitor type configured for the integration.
Verify credential provisioning — Verify that the visitor profile is created in the vendor system and that credentials are provisioned correctly.
Test credential access — Test the credential at a compatible reader to ensure access is granted.
Verify credential revocation — Check out the test visitor and verify that access credentials are revoked after the configured grace period.
Check failure notifications — Monitor the integration failure notifications to ensure they are working correctly.
Need help? Contact Sine Support at [email protected]