Integriti Inner Range
Integration Guide

This integration connects Sine with Inner Range's Integriti access control system, allowing visitor and access data to flow between the two platforms. It enables organizations to manage physical access permissions for visitors directly through their existing Integriti infrastructure. This guide is intended for system integrators and IT administrators responsible for configuring and maintaining the connection between Sine and Integriti.
Overview
Sine integrates with Integriti Inner Range to automatically provision and revoke visitor access credentials, with simplified connectivity for on-premise deployments through Sine Secure Bridge. This integration supports Sine QR Code credentials, which can be assigned via QR codes printed on visitor badges or sent to visitors via SMS.
How It Works
Sine connects to Integriti Inner Range to synchronize visitor credentials with the access control system, allowing visitors to move through controlled doors using a QR code issued through Sine.
QR Code
Visitors are issued a Sine QR Code credential that can be scanned at compatible readers to unlock doors provisioned in Integriti Inner Range.
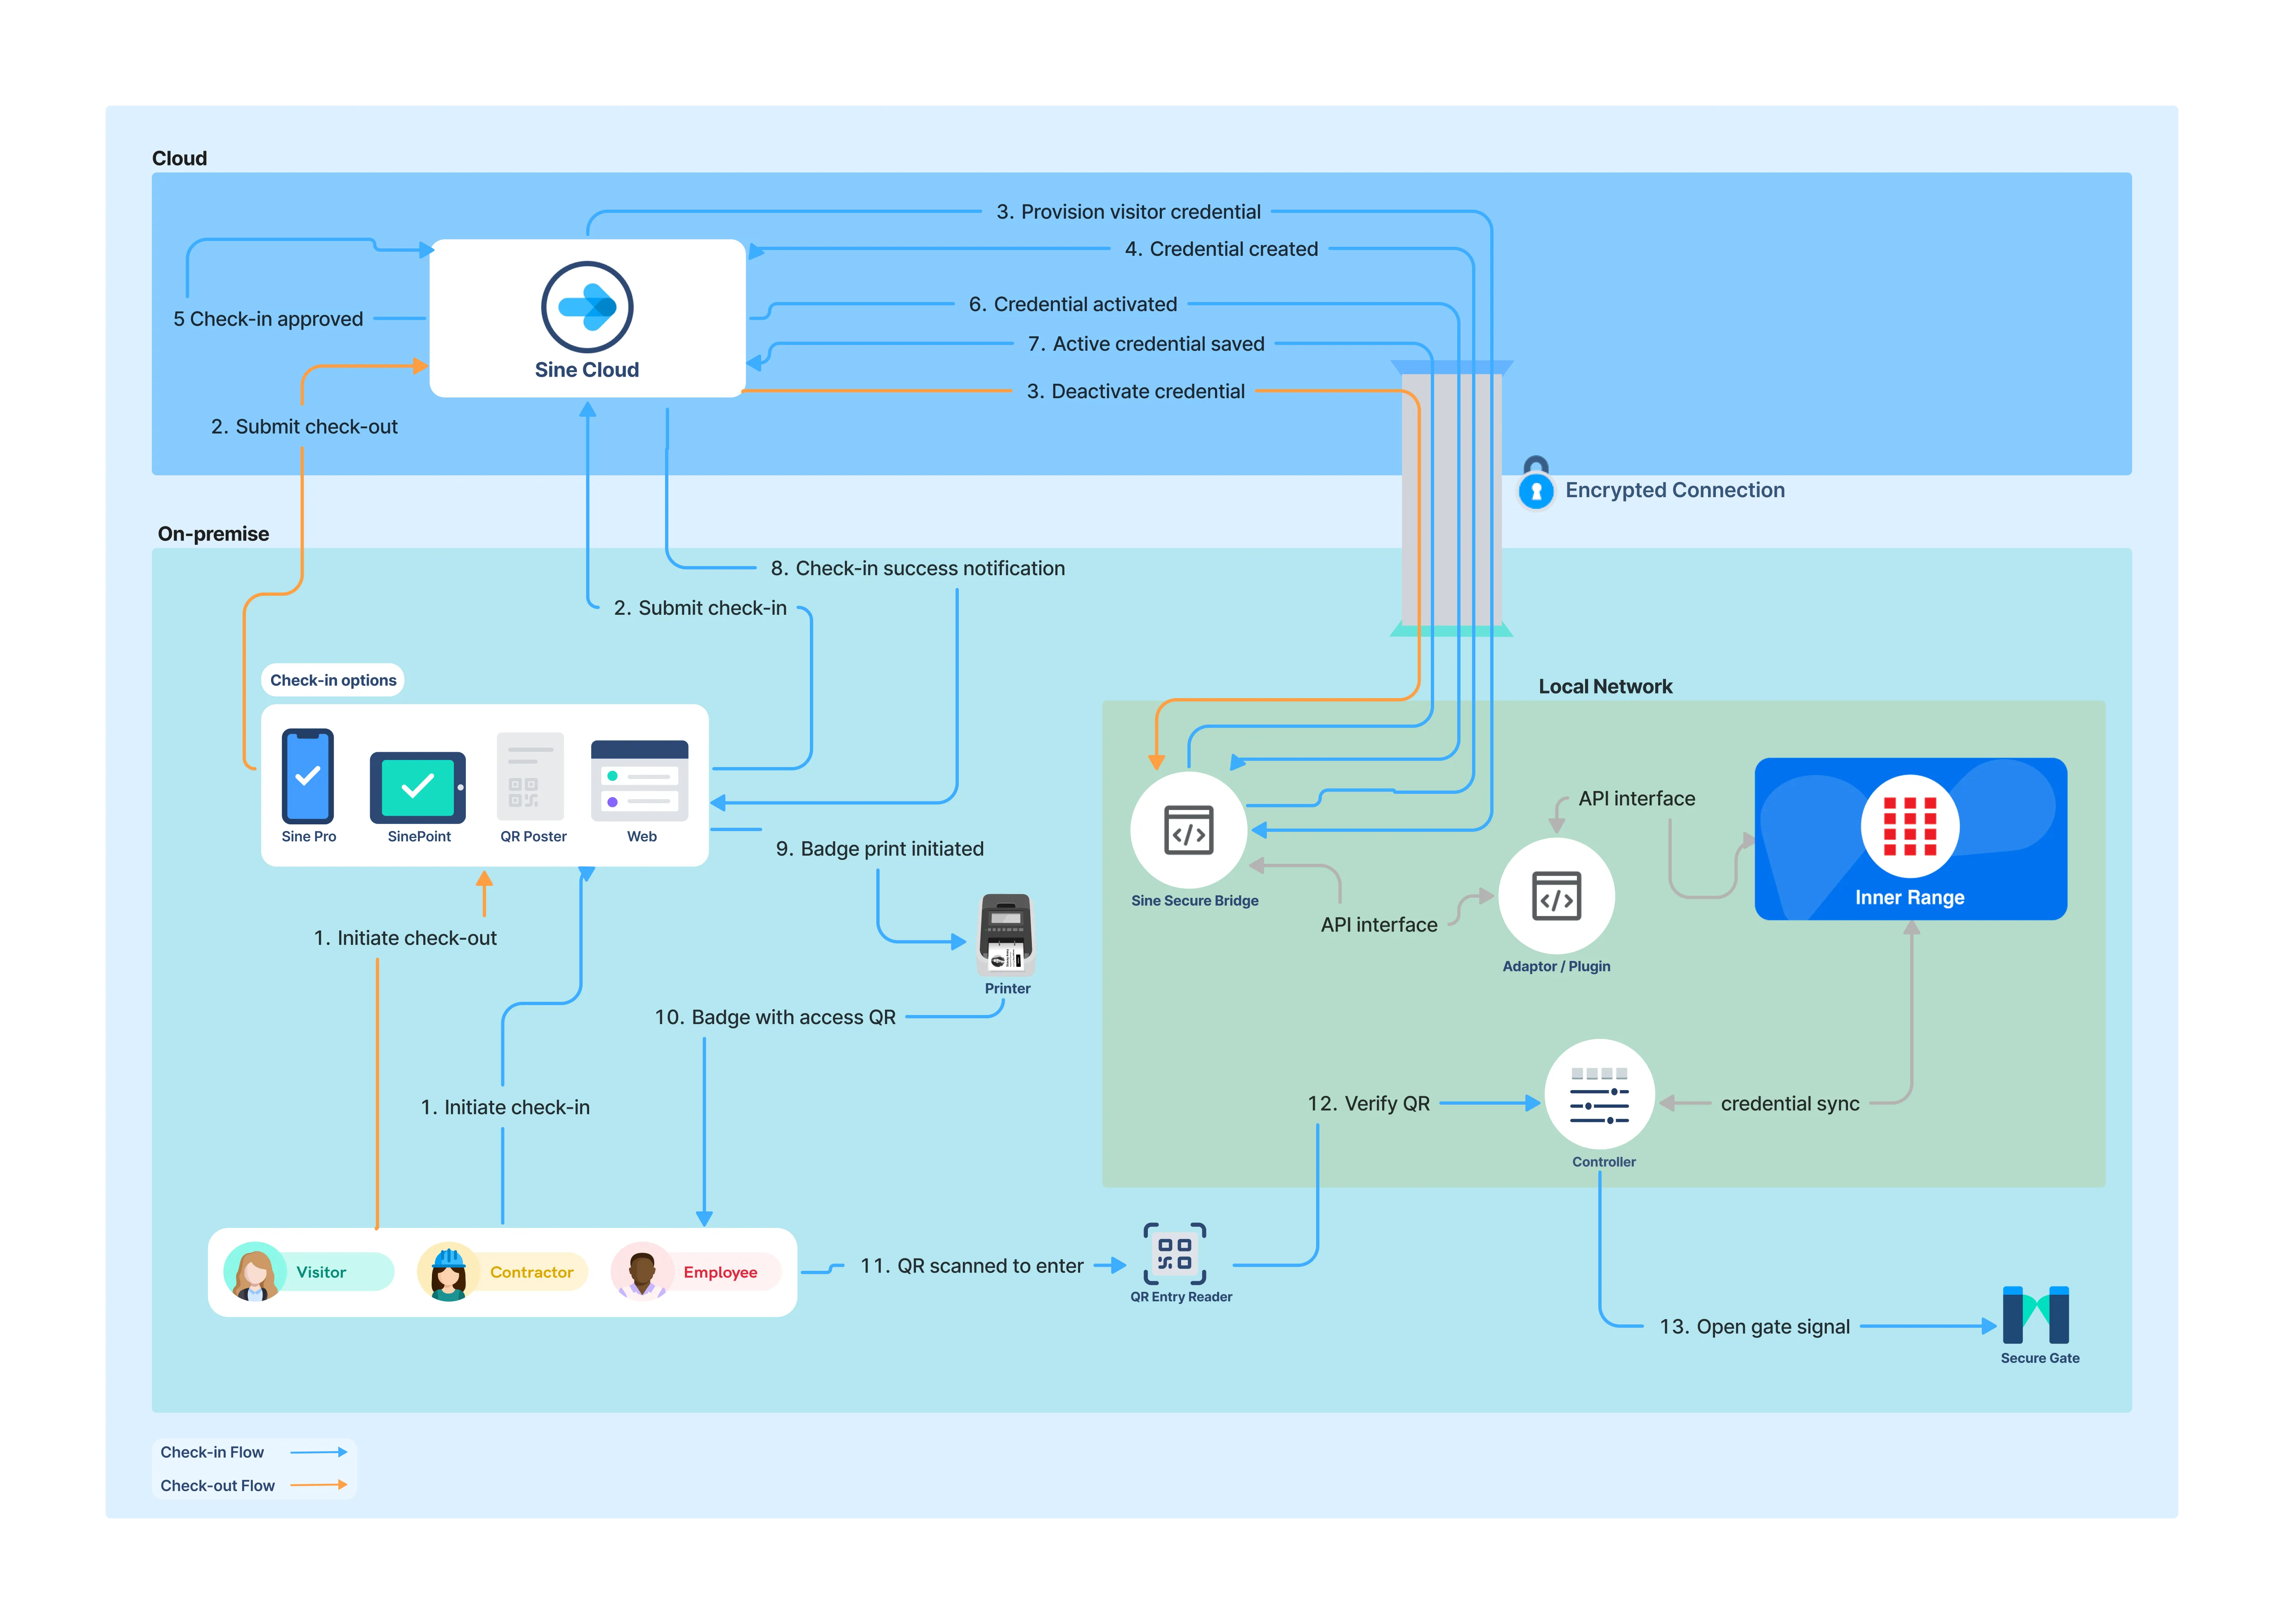
Check-in Flow:
The visitor initiates check-in through Sine, using a kiosk, the mobile app, a web check-in form, or a printed QR poster at the site entrance.
Sine provisions a unique QR code credential for the visitor, scoped to the access groups assigned for the duration of their visit.
Once the visit is approved following any required security and compliance checks, Sine activates the QR code credential in Integriti Inner Range.
Sine delivers the QR code to the visitor via SMS or displays it on their printed or digital badge.
The visitor presents the QR code at a reader equipped with QR or barcode scanning support, and Integriti Inner Range unlocks the associated door.
Check-out Flow:
The visitor checks out using the Sine app, a kiosk, by notifying their host, or automatically upon exiting the configured geofence area.
Sine revokes the QR code credential in Integriti Inner Range, preventing the visitor from gaining further entry through the system.
Requirements
Sine Requirements
- Integration enablement: Confirm that your Sine subscription supports the Integriti Inner Range integration and that it is enabled on your account. Additional fees may apply.
Integriti Inner Range Requirements
- Integriti system: You need an Inner Range Integriti system running version 21 or higher.
- API License: An Inner Range API license must be enabled with appropriate user permissions configured.
- Sine Integriti Plugin: The Sine Integriti Plugin is data translation middleware developed by Integriti. Install it on the Integriti server.
- QR Reader: If you plan to use QR codes for access, you need compatible QR access readers. Confirm reader compatibility with Integriti or your Access Control Integration Partner. A reader such as this one is suggested as an example.
- Credential pool: If you plan to use physical access cards, ensure you have an available credential pool.
- Testing environment: Set up a sandbox environment or another safe testing space to validate the integration before deploying it to production.
- Network connectivity: Determine how you will connect Sine with your on-premise Inner Range system.
- Direct API access: This method requires network firewall access to the Inner Range API from outside your network.
- Sine Secure Bridge: This method requires installation of the Sine Secure Bridge agent to establish a secure, managed tunnel between your on-premise Inner Range system and Sine.
Configuration
Integriti Inner Range Configuration
Sine Plugin Configuration
The following are simplified instructions for installing and configuring the Sine Plugin. For full instructions, please see Sine_Integration_Manual-v1.2.pdf.
Before you install the Sine Plugin, you must stop all running Integriti services.
Open Services App — Click on the Windows Start bar and click on the Services app when it appears.
Stop IR Integriti services — Stop all IR Integriti services. There are four services that you need to stop.

Install the plugin — Once the services have stopped successfully, run Integration_Sine_Plugin_1.2.0.2613.exe to install the plugin.
Restart Integriti services — When the installation is complete, restart all the IR Integriti services.
Integriti System Designer Configuration
Your version of Integriti System Designer may show different controls. The examples in this document are from v23.
Adding the Sine Plugin
Select Integrations and New Integrated Device — Select Integrations and then New Integrated Device from the top-level tab.

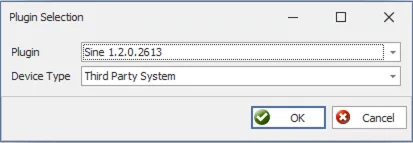
Select the Sine plugin — In the dialog that appears, select the Sine plugin and click OK.
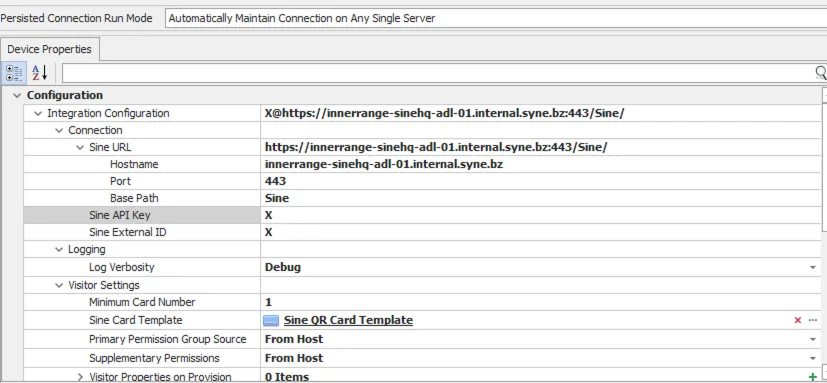
Configure the integration name and connection settings — Name the integration (any name is fine) and set the Persisted Connection Run Mode to "Automatically Maintain Connection on Any Single Server."
Fill in the Connection Details — Complete the connection configuration with your Sine integration details.
IIS Configuration
Sine Secure Bridge reaches your Integriti server through a single tunnel URL, but the Integriti Sine Plugin listens on four separate routes. IIS bridges the two: it accepts requests on a shared /ssb path and redirects each one to the matching plugin route.
Complete this section only if you are connecting through Sine Secure Bridge. A direct network connection does not require it.
Install the URL Rewrite module — Install the IIS URL Rewrite module from https://www.iis.net/downloads/microsoft/url-rewrite. IIS ignores the rewrite rules added in step 4 if the module is not installed.
Check the SSL certificate — Confirm an SSL certificate is bound to the site in IIS. It can be self-signed, because Secure Bridge terminates the tunnel inside your own network and the certificate is not validated against a public certificate authority.
Update the site bindings — In IIS Manager, navigate to Sites > Default Web Site and click Bindings… in the Actions pane on the right. Edit both the port 80 and the port 443 bindings and set Host Name to the machine name, for example DESKTOP-WIN1234. The machine name is shown in the Connections pane on the left of IIS Manager.
Add the rewrite rules — Add the following rules to the web.config file for the site, usually found in C:\inetpub\wwwroot. Each rule maps one /ssb route to its plugin equivalent, so a request to /ssb/verify is redirected to /Sine/Verify.
<rewrite>
<rules>
    <rule name="Sine Rewrite Verify" stopProcessing="true">
        <match url="^.*$" ignoreCase="false" />
        <conditions logicalGrouping="MatchAll">
            <add input="{URL}" pattern="^/ssb/verify$" />
        </conditions>
        <action type="Redirect" url="/Sine/Verify" redirectType="Temporary" />
    </rule>
    <rule name="Sine Rewrite Provision" stopProcessing="true">
        <match url="^.*$" ignoreCase="false" />
        <conditions logicalGrouping="MatchAll">
            <add input="{URL}" pattern="^/ssb/provision$" />
        </conditions>
        <action type="Redirect" url="/Sine/Provision" redirectType="Temporary" />
    </rule>
    <rule name="Sine Rewrite Activate" stopProcessing="true">
        <match url="^.*$" ignoreCase="false" />
        <conditions logicalGrouping="MatchAll">
            <add input="{URL}" pattern="^/ssb/activate$" />
        </conditions>
        <action type="Redirect" url="/Sine/Activate" redirectType="Temporary" />
    </rule>
    <rule name="Sine Rewrite Deprovision" stopProcessing="true">
        <match url="^.*$" ignoreCase="false" />
        <conditions logicalGrouping="MatchAll">
            <add input="{URL}" pattern="^/ssb/deprovision$" />
        </conditions>
        <action type="Redirect" url="/Sine/Deprovision" redirectType="Temporary" />
    </rule>
</rules>
</rewrite>
Alternatively, use Import Rules in the URL Rewrite module to import the equivalent rules in .htaccess format:
RewriteEngine On
RewriteCond %{REQUEST_URI} ^/ssb/verify$ [NC]
RewriteRule ^.*$ /Sine/Verify [R=308,L]
RewriteCond %{REQUEST_URI} ^/ssb/provision$ [NC]
RewriteRule ^.*$ /Sine/Provision [R=308,L]
RewriteCond %{REQUEST_URI} ^/ssb/activate$ [NC]
RewriteRule ^.*$ /Sine/Activate [R=308,L]
RewriteCond %{REQUEST_URI} ^/ssb/deprovision$ [NC]
RewriteRule ^.*$ /Sine/Deprovision [R=308,L]Restart the site — Restart the site from Actions > Manage Website > Restart so IIS picks up the new rules.
Configure the plugin connection — In Integriti, open Third Party Systems > Sine Integration and set Hostname to the machine name, Port to 443, and Base Path to Sine. These three values are mandatory: the rewrite rules redirect to /Sine on port 443 of the machine name, so any other combination breaks the connection.
Set the tunnel Service URL — In Sine Admin, open the Secure Bridge tunnel that reaches your Integriti server and set its Service URL to https://[MACHINE NAME]/ssb, for example https://DESKTOP-WIN1234/ssb. Include both the https scheme and the /ssb path.
Test the connection — Open the Inner Range integration in Sine and click Test connection to confirm the tunnel reaches the plugin.
Troubleshooting
Check the following if Test connection fails in Sine.
- 404 Not Found: The tunnel Service URL is missing the /ssb path, the Service URL is missing the https scheme, or the rewrite rules were not created correctly. Also sign in to the Integriti server and confirm the Sine Plugin is still online.
- 504 Gateway Timeout: The tunnel Service URL is incorrect. Confirm the machine name in the Service URL matches the machine name of the Integriti server.
Host Configuration
Each host in Sine that will need to be accessible must be configured in Integriti as a user. This section explains the configuration requirements and how visitors are provisioned within the system.
Configure host email address — The host's email address (not mobile number) must exist in Integriti in the Sine Integration properties. This email address is used to match hosts during the visitor check-in process.
Assign host to a Permission Group — The host must be assigned to a Permission Group. This same group is assigned to visitors during check-in, controlling their access permissions.

Understand check-in requirements — If a visitor does not have a First or Last name entered, or if the visitor is being checked in to a host whose email address does not match a user in Integriti, the check-in will fail. Ensure all visitor data is complete and host email addresses are correctly configured.
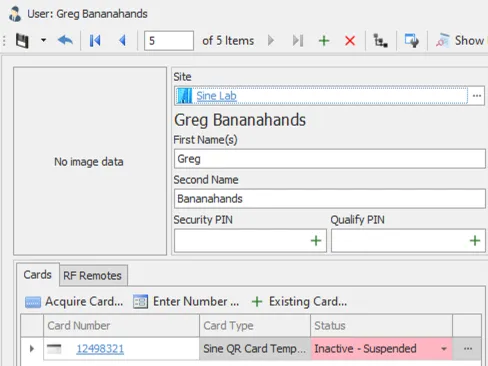
Visitor appears in Integriti — Upon successful check-in, the visitor appears as a user in Integriti with their name and associated information.

Credential provisioning — The visitor is provisioned a Sine QR Card credential set to "Expiring" status, meaning it is valid only for the duration of the visit.
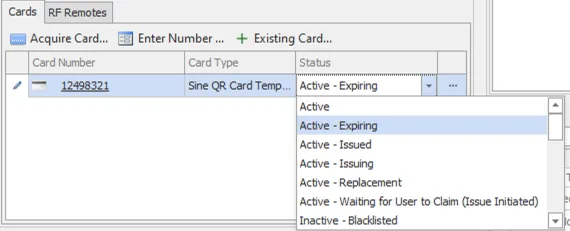
Checkout behavior — When the visitor is checked out, their user account in the Integriti system is suspended, and any provisioned credentials are marked as inactive.
Sine Configuration
General Setup
Admin permissions — Ensure you have Team or Site Admin permissions. These permissions are required to configure integrations.
Log in — Log in to the Sine admin dashboard at https://dashboard.sine.co.
Select site — Navigate to the Locations tab and click on the site you want to configure the integration for.
Add integration — In the Site menu, click Integrations. Click Add integration and select Integriti Inner Range from the list of available integrations. If the integration does not appear in the list, contact support.
Name integration — Enter a name for the integration. You can use any name, but choose something that helps you identify the integration's purpose.
Connect to Integriti Inner Range
Connection Method
There are two ways to establish network connectivity to your on-premise Integriti Inner Range instance.
Select your preferred method below.
Sine Secure Bridge enables a secure, managed tunnel between Sine Cloud and your on-premise system's API.
Enable Secure Bridge — Switch Use Sine Secure Bridge on to display a dropdown list of your Secure Bridge tunnels. If you do not see the Sine Secure Bridge toggle, contact your Sine representative.
Documentation — For more information on installing and configuring a Sine Secure Bridge tunnel, visit the Secure Bridge Documentation.
Authentication
API Key — Enter your Integriti Inner Range API Key and your External ID. The External ID can be any value.
Test Connection — Click Test connection to confirm that your configuration is correct. Once you have successfully verified that Sine can connect to your Integriti Inner Range account, the Integration Settings section becomes available.
Integration Settings
Credential Configuration
Controls the type of access control credential generated when the integration runs.
Select your preferred credential type below.
Generates and attaches a QR code to a visitor's pass. The integration runs when a pass is created or expired, or when the visitor checks out.
Badge Style — Select the style of printed badge to be used when this integration is triggered. Some access control readers require a specially formatted Access badge style rather than the default name badge style.
Send QR Code by SMS — If the visitor's mobile number is available, send them a QR code credential by SMS. This can serve as a useful backup to a badge printer.
Provision credential on check-in — Select one or more visitor types for which you want the integration to provision credentials in your access control system when they check in using Sine. Make sure the Host Selection Required checkbox is ticked for any visitor types used in access control integrations. Without this setting, visitors would be provided with access credentials without requiring host approval. You can review which of your visitor types have Host Approval Required enabled in the General tab of your site settings.
Grace Period — A visitor may check out in Sine before physically leaving the location, and may still need to use their credentials to exit. Set a grace period to ensure their access control credentials are not deprovisioned immediately after being checked out in Sine.
Messages
- Visitor failure message — Enter the message to be displayed to the visitor if the access control integration fails for any reason.
Notifications
- Send integration failure notifications — Enter one or more email addresses to be notified if the integration fails, along with the corresponding failure details.
Testing
Create a test check-in — Create a test visitor check-in using a visitor type configured for the integration.
Verify credential provisioning — Verify that the visitor profile is created in the vendor system and that credentials are provisioned correctly.
Test credential access — Test the credential at a compatible reader to ensure access is granted.
Verify credential revocation — Check out the test visitor and verify that access credentials are revoked after the configured grace period.
Check failure notifications — Monitor the integration failure notifications to ensure they are working correctly.
Need help? Contact Sine Support at [email protected]